- Online Fax >
- Receive Fax to Gmail
How to Receive Fax to Gmail
Faxing has been a significant method for businessmen in managing their communications efficiently. It has provided users with reliability and security, which has led to its large-scale adoption. Although the use of fax machines has decreased, people can now fax their documents in a better version. This guide will discuss how to fax with Gmail through the internet in detail.
CocoFax Gmail Fax Solution
Sending and receiving faxes through Gmail is possible with the help of a third-party interceptor called CocoFax. This is an all-in-one online fax solution that has dedicated its objectives to provide users with effective business communications. CocoFax features itself as a cost-effective online tool that translates communication from the fax to email and vice versa.
Whatever nature your business is, CocoFax easily adapts it to provide you a worthwhile experience. It integrates with Chrome, Slack, Google, and Microsoft, and can be used on Windows, Mac, and Android smartphones.
It is easy to manage faxes through your Gmail with the help of CocoFax. There are no obligations of installing any application across your system. You are simply required to sign up with your Gmail accounts with CocoFax. CocoFax acts as a mediator throughout the process of sending and receiving fax across the Gmail account.
Setting Up Your Gmail Account for Fax
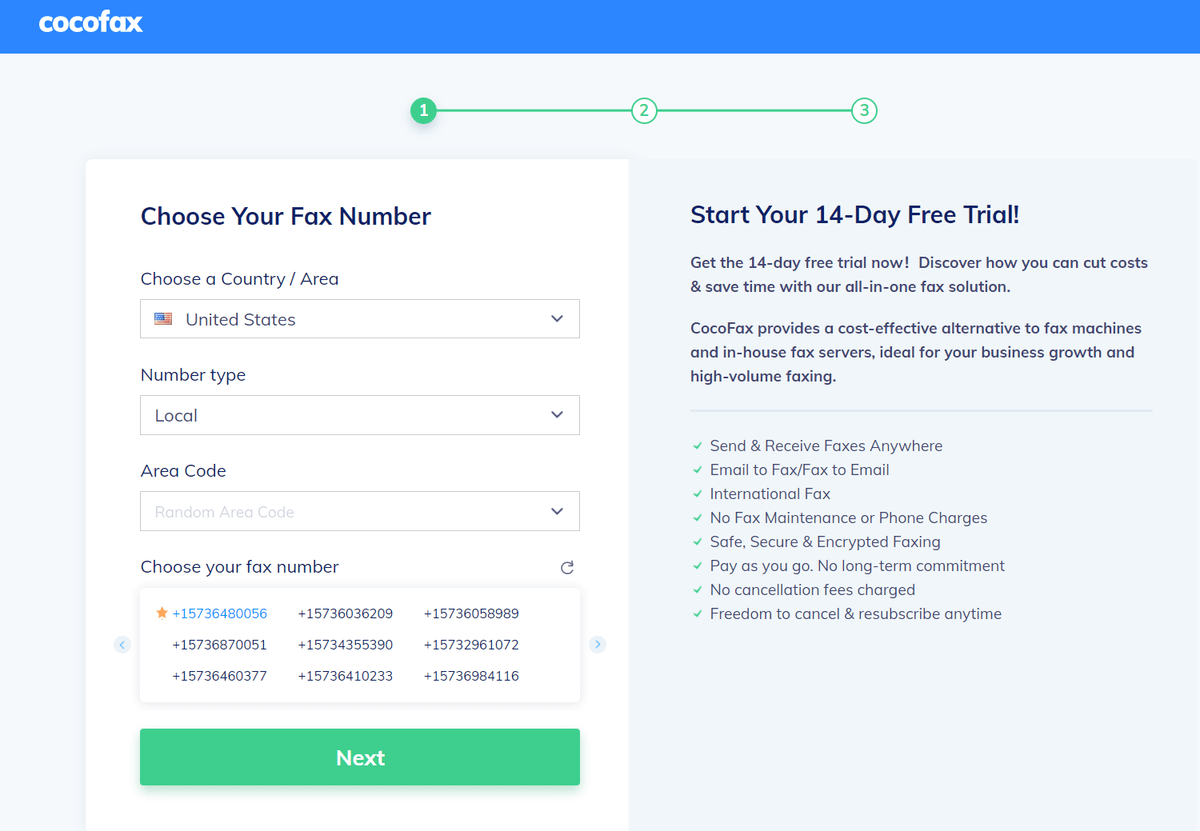
Step 1: Set up your CocoFax account by signing up with your Gmail account. You can select your own fax number for free as well.
Step 2: Open your Gmail and compose a new email. Add the receiver’s email address in a specific format - the country code, the fax number, and the suffix “@cocofax.net”.
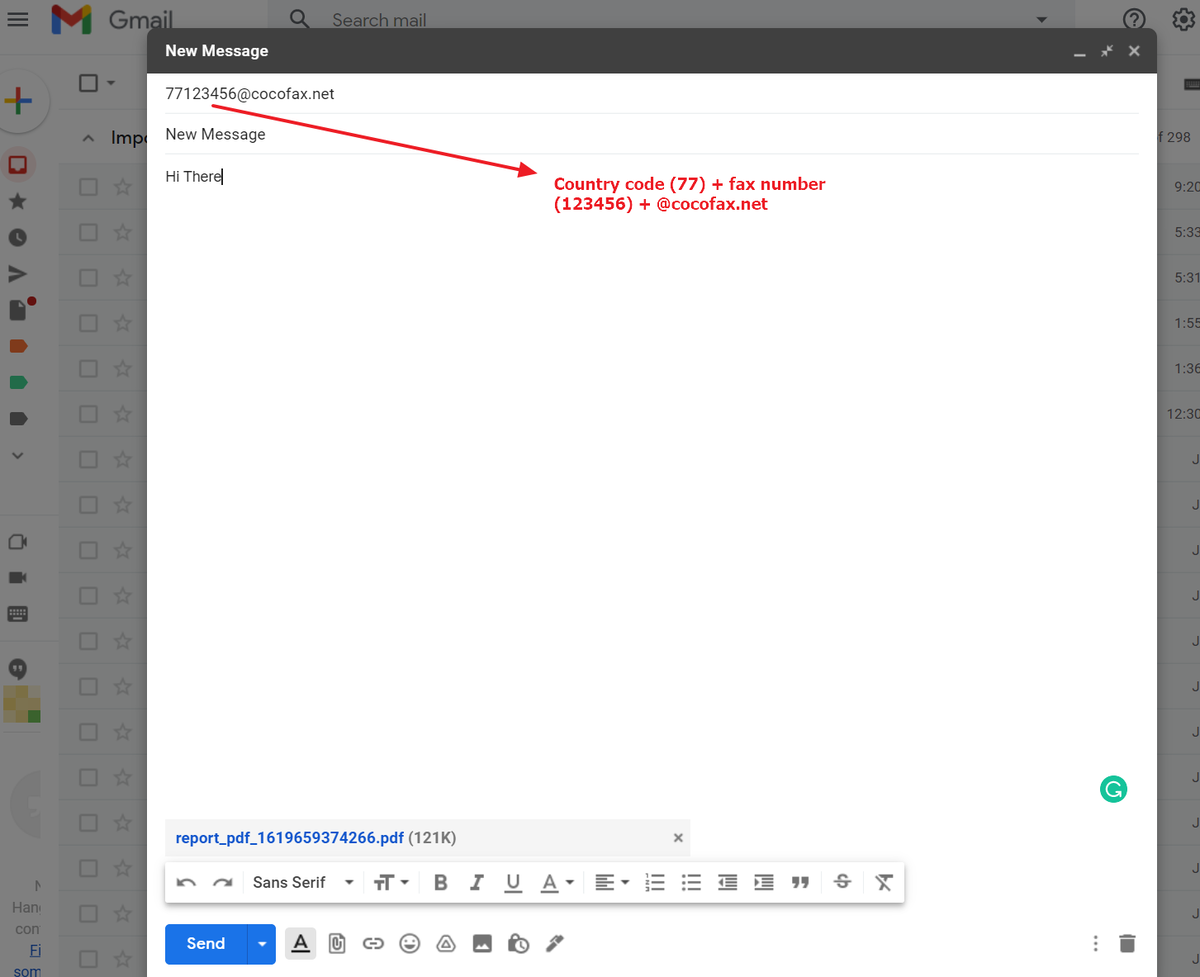
Step 3: Attach your documents and type a subject or message in the email. Send it after everything is ready.
Step 4: CocoFax will soon convert your email into a fax document, and then send it to the receiver's fax machine.
You can also watch the video below:
Never Miss Out on Any Gmail Fax with Immediate Alerts
As CocoFax made it easier for users to send and receive faxes across their Gmail account, they can also have themselves notified of their important faxes. This can be done by turning on the notifications for your Gmail account. This process can be carried out in two ways which will help the user to keep himself notified about the incoming faxes.
Enabling Gmail Fax Notification for Desktop
Step 1: Tap on the ‘Gear’ icon on the top-right corner of your Gmail account screen and proceed with selecting ‘Settings’ from the drop-down menu.
:max_bytes(150000):strip_icc():format(webp)/002-save-a-message-as-a-draft-quickly-in-gmail-1172097-78660db9650a4c05959c62f4defb73a5.jpg)
Step 2: Select the 'General' tab on the top of the available menu and scroll down the screen to access the 'Desktop Notifications' section. The user is made available to three different options of turning on their desktop notifications. It is up to the user to turn on notifications for new mails, important mails or have them turned off. After selecting a specific option, tap on 'Click here to enable desktop notifications for Gmail.'
:max_bytes(150000):strip_icc():format(webp)/002-how-to-get-new-mail-notifications-for-gmail-1171935-846a3af42fb74b1bb461a641fe28af31.jpg)
Step 3: Scroll down to the bottom of the screen and select 'Save Changes.' If you are a Windows user, you may need to enable notifications from Google Chrome or any other browser from your device settings.
:max_bytes(150000):strip_icc():format(webp)/003-how-to-get-new-mail-notifications-for-gmail-1171935-3a7bd3a94c6d42a0b68516442908fd9b.jpg)
Step 4: Type in ‘Notifications & Action Settings’ in the Windows Search bar and open the appropriate option. With a new screen opened on the front, turn on the notifications for your browser. Refresh your browser to put the changes in effect.
:max_bytes(150000):strip_icc():format(webp)/005-how-to-get-new-mail-notifications-for-gmail-1171935-ccfd237f6912469c99750fc428e60d08.jpg)
Enabling Gmail Fax Notification for Smartphones
Step 1: Access Gmail on your smartphone and log in with your appropriate Gmail account to proceed. Select the ‘three-stacked lines’ on the screen and proceed to select ‘Settings’ from the pop-up menu.
Step 2: Select the desired account from the available list and proceed towards selecting ‘Notifications’ from the next screen.
Step 3: Set the desired notifications settings to 'All,' 'High Priority,' or 'None' according to your requirement. You can also set the option of 'Inbox Notifications' across the same screen.
Conclusion
This guide has featured a detailed explanation of how users can send and receive faxes across their Gmail account. It is quite easy for users to manage their faxes with their Gmail as long as they try out the platform, CocoFax.